How to use Blender with OSG/VTP
This page describes how to use the free modelling tool
Blender to produce 3D models which look correct
in realtime 3D software. Although the emphasis is on the
VTP software built on
OSG, most of these instructions
are also relevant for other OSG users and even other 3D runtimes.
1. Beware Blender Tutorials
There are lots of Blender tutorials which teach you how to build models and
apply materials. However, they assume you will be rendering your scene
inside Blender, using the non-realtime raytracer. Applying materials for
realtime use is very different! Hence, this page.
2. Link to Object vs. Link to Mesh
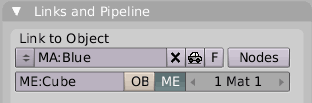
Let's say you want to make a blue cube. You select your cube, bring
up the Material buttons, and see something like this:

See the OB and ME? If the OB button is highlighted,
it's showing you the material that's mapped to the Cube Object.
If the ME button is highlighted (as it is in the picture), it's showing
you the material that's mapped to the Cube Mesh.
This is an important distinction. You must map colored materials
to the mesh (ME). Anything mapped to the object is ignored
when you export your object.
You may see Blender tutorials and documentation describing how to map more
than one material to a mesh (that 1 Mat 1 up there). Don't do it.
Stick to one material. For example, with one blue material linked to your
mesh, it will look like this:
That goes for textures as well. Use no more than one texture per mesh!
Which brings us to:
3. Applying a Texture
Making a textured object is surprisingly very different from a simple colored
object. To start with, you do not make a material. Instead,
you use a very different Blender method of applying a texture.
Here is an example of texturing a cube. Select your object and change
your mode to UV Face Select:
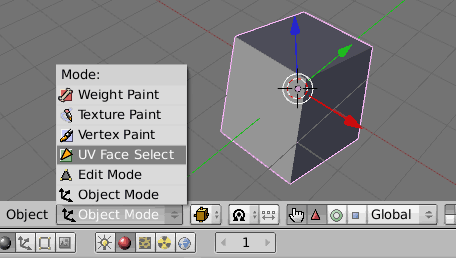
In this mode, you will map a texture onto your object using UV coordinates.
There are several good tutorials on how to do this operation in Blender (BioRust
UV Mapping,
Blender 3D: Noob to Pro/UV Map Basics). What's important is to use
the UV/Image Editor to apply the texture, using the command Image:
Open:
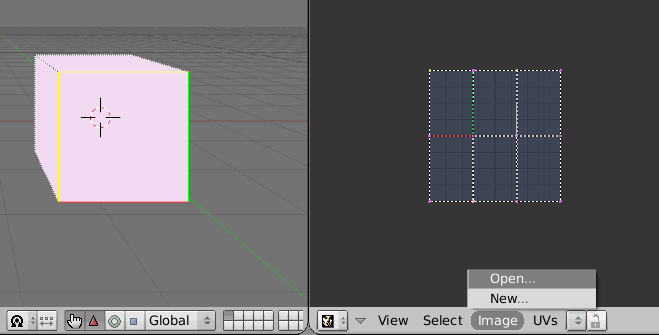
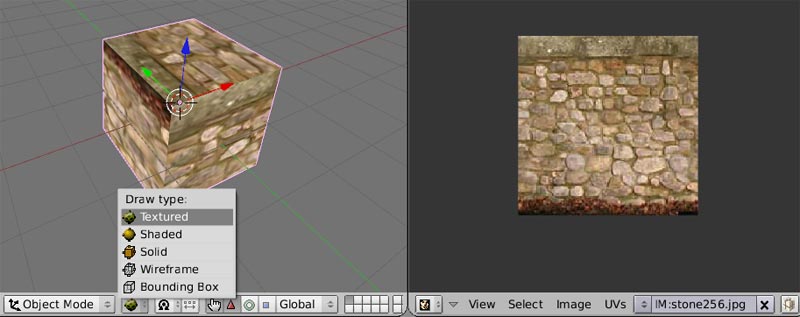
Once the image is open, and you've done some UV mapping, then the texture
should appear on your object in the 3D View, when you choose Draw type: Textured:
If you want to change the texture image later, go back to UV Face Select
mode and use the UV/Image Editor to open another image.
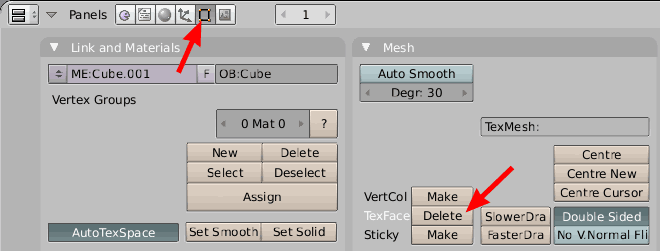
4. Removing a Texture
Removing a texture might seem as simple as pressing that little X
in the UV/Image Editor while UV editing your object. But there is another
step! Select your object and use the buttons for Editing (F9).
In the Mesh area, you will see the word TexFace and a button next
to it which says Delete. Press Delete. Now the texture is
really gone:
5. Exporting: File Format
Blender comes with lots of export options. I count export to 27 different
file formats in the current version! However, only a few of these work
well as a way to transfer models to realtime rendering systems. In my
testing, the following work the best with OSG:
- Collada 1.4 (.dae)
- OpenSceneGraph (.osg)
- Wavefront (.obj)
If you don't see .osg listed on your File: Export menu, you can get
it from the osgexport
page. Unzip it into your .blender/scripts folder, and
the next time you run Blender it should be there.
Each of the three formats has pros and cons. Here are a few issues
to consider with each format.
- .dae:
- It's a new and complex file format, so not much software supports
it yet.
- Standard OSG 1.1 doesn't read it by default, but there is a Collada
reader available as a separate project.
- It's an XML format, so the files are rather big.
- .osg:
- Naturally, it's OSG-specific, which is fine if OSG/VTP is your only
destination.
- It's also quite a bulky text format, although you can use CManager
(VTP) or osgconv (OSG) to convert your .osg to a smaller, binary .ive
file.
- .obj:
- It's a simple, ancient format, fairly limited, but widely supported.
- It doesn't support scene hierarchy, so all your coordinates will
be "flattened" into a single space.
- Blender (in which the Z axis points up, or Z-up for short) writes
OBJ files which are Z-up. OSG (by default) assumes .obj files
are Y-up, so unless you take steps to deal with it, they will be turned
90 degrees.
6. Using Blender's osgexport with the VTP Software
Blender was primarily designed for making detailed, non-realtime scenes,
rendered with a raytracer. It has a different way of thinking about material
properties and lights, which doesn't quite fit with OpenGL (and hence OSG/VTP).
However, osgexport has some options you can set to compensate for the difference.
Here is a quick list of what to do:
- When creating a material (for any normal colored surface - remember,
textures don't use materials), in Blender's Material controls, set
the color to 2/3 of the fully illuminated color you want. For example,
if an object should be pure blue (0.0 0.0 1.0) on its lit surface, use (0.0
0.0 0.666).
- In the osgexport UI, turn on Ambient and TexMats:
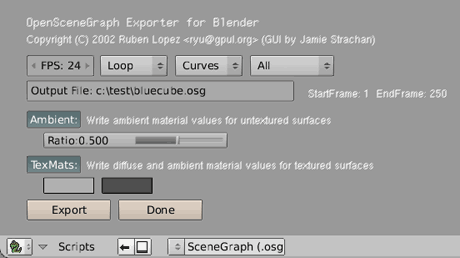
- You can leave the values at the default (Ambient ration 0.5, TexMats
diffuse 0.7 and ambient 0.3)
- Export!
Why these values?
For those interested, here is an explanation
of why the above values produce good results, and how ambient lighting works
in OpenGL, and the VTP software in particular.
7. Dealing with existing models
Sometimes you get a whole model from someone else instead of creating a model
from scratch. In that case, see How to fix Blender
models for use with OSG/VTP.